
 International
 Singapore
 Malaysia
 Thailand
 Vietnam
Your shopping cart is empty!

RC Sumo using Maker Mini Sumo Controller
- Khairul_Tajudin
- 26 Apr 2024
- Tutorial
- Beginner
- 790
This tutorial is focusing on how to use RC Controller with Maker Mini Sumo Controller board in Sumo Robot development. Maker Mini Sumo Controller is purposely built for Autonomous Sumo Robot with Ikedo Mini Sumo Robot, but this controller also can support RC Mode.
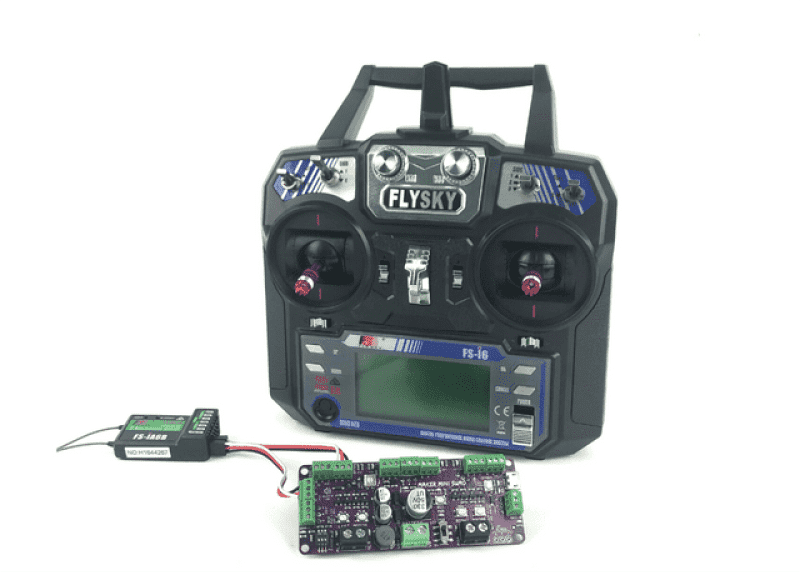
By connecting the RC receiver to the extra GPIO ports on the Maker Mini Sumo Controller, you can turn your robot into a RC controlled robot. The best part is, it doesn't use up any existing port for sensors and this allows you to participate in both RC and autonomous categories with the same robot.
Code:
#include "CytronMakerSumo.h"

const int chA=A2;  //GPIO 01
const int chB=A3;  //GPIO 02

int ch1;  //Variables to store and display the values of each channel
int ch2;  //Variables to store and display the values of each channel

int ch1Min = 969; // read from serial monitor
int ch1Max = 1960; // read from serial monitor
int ch2Min = 966; // read from serial monitor
int ch2Max = 1957; // read from serial monitor

int offset = 15;  // Offset value for STOP function, get value from Serial Monitor
int val;

void setup() {
  // put your setup code here, to run once:
  MakerSumo.begin();
  Serial.begin(9600);

  // Set input pins
  pinMode(chA, INPUT);
  pinMode(chB, INPUT);
}

void loop() {
  // put your main code here, to run repeatedly:
  // read the input channels
  ch1 = pulseIn (chA,HIGH);  //Read and store channel 1
  Serial.print ("Ch1:");  //Display text string on Serial Monitor to distinguish variables
  Serial.print (ch1);     //Print in the value of channel 1
  Serial.print ("|");

  ch2 = pulseIn (chB,HIGH);
  Serial.print ("Ch2:");
  Serial.print (ch2);
  Serial.print ("|");

  //LEFT & RIGHT
  int SpeedCh1 = map(ch1,ch1Min,ch1Max,-255,255);
  Serial.print (SpeedCh1);
  Serial.print ("|");

  //FORWARD & BACKWARD
  int SpeedCh2 = map(ch2,ch2Min,ch2Max,-255,255);
  Serial.print (SpeedCh2);
  Serial.println ("|");

  if (SpeedCh2 > offset && SpeedCh2 <= 255)
  {
    Serial.print("FORWARD");
    Serial.print ("|");
    MakerSumo.setMotorSpeed(MOTOR_L, SpeedCh2);  // Left motor forward
    MakerSumo.setMotorSpeed(MOTOR_R, SpeedCh2);  // Right motor forward
  }

    else if (SpeedCh2 < -offset && SpeedCh2 >= -255)
  {
    Serial.print("BACKWARD");
    Serial.print ("|");
    MakerSumo.setMotorSpeed(MOTOR_L, SpeedCh2);  // Left motor backward
    MakerSumo.setMotorSpeed(MOTOR_R, SpeedCh2);  // Right motor backward
  }

  else if (SpeedCh1 > offset && SpeedCh1 <= 255)
  {
    Serial.print("Turn RIGHT");
    Serial.print ("|");
    MakerSumo.setMotorSpeed(MOTOR_L, SpeedCh1);  // Left motor forward
    MakerSumo.setMotorSpeed(MOTOR_R, -SpeedCh1);  // Right motor backward
  }

  else if (SpeedCh1 < -offset && SpeedCh1 >= -255)
  {
    Serial.print("Turn LEFT");
    Serial.print ("|");
    MakerSumo.setMotorSpeed(MOTOR_L, SpeedCh1);  // Left motor backward
    MakerSumo.setMotorSpeed(MOTOR_R, -SpeedCh1);  // Right motor forward
  }


  else if (SpeedCh1 <= offset && SpeedCh1 >= -offset)
  {
    Serial.print("STOP");
    Serial.print ("|");
    MakerSumo.setMotorSpeed(MOTOR_L, 0);  // Left motor stop
    MakerSumo.setMotorSpeed(MOTOR_R, 0);  // Right motor stop
  }

  delay(100);
}
Explaination:
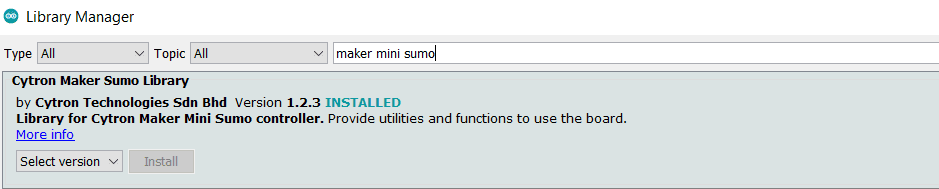
1. Include library
#include "CytronMakerSumo.h"
Library that we will use along this program. Need to include the library by searching Cytron Maker Sumo Library
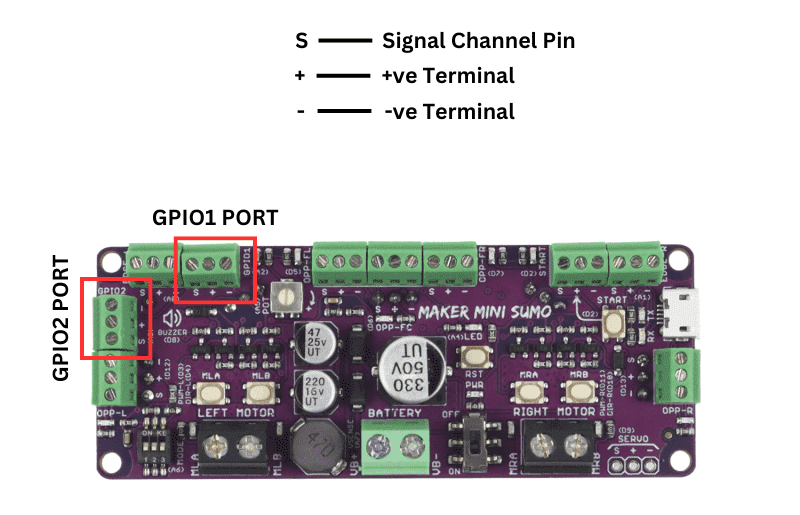
2. Initialize Pin
const int chA=A2; //GPIO 01
const int chB=A3; //GPIO 02
We will refer to the Datasheet of Maker Mini Sumo on Arduino Pin Mapping.

3. Variable value
int ch1; //Variables to store and display the values of each channel
int ch2; //Variables to store and display the values of each channel
Variable value that will be used to check the value of each channel. The value will display through the serial monitor.
4. Minimum and Maximum value for Channel 1 and Channel 2
int ch1Min = 969; // read from serial monitor
int ch1Max = 1960; // read from serial monitor
int ch2Min = 967; // read from serial monitor
int ch2Max = 1959; // read from serial monitor
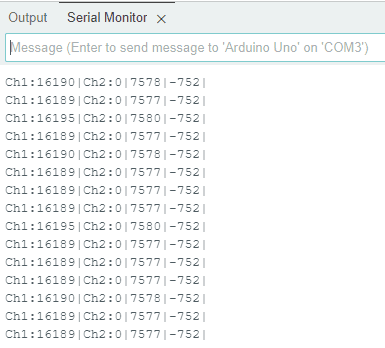
All this value will get after running the code and see on the serial monitor display. Turn on your RC Controller and pull the channel into full throttle. You may see a different value when the throttle is changed. Put the maximum and minimum values on code based on the value you get.
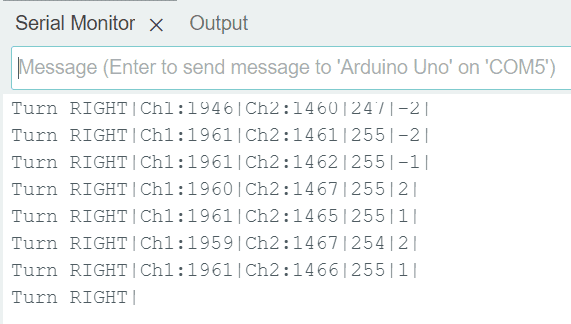
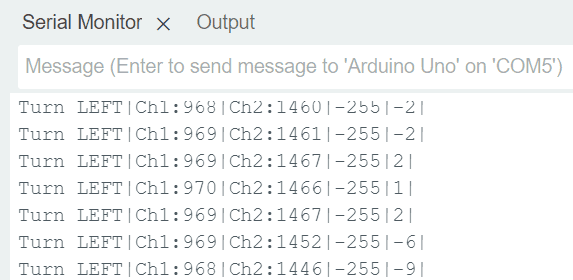
Channel 1:
Right Throttle (1959-1961) - ch1Max
Left Throttle (968-970) - ch1Min
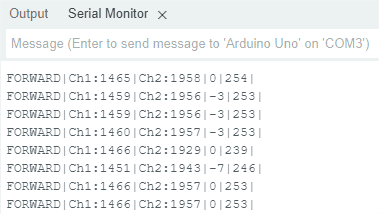
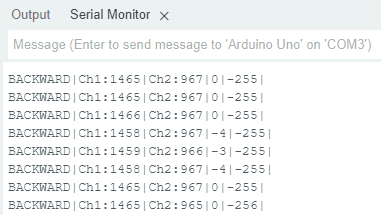
Channel 2:
Forward Throttle (1956-1958) - ch2Max
Backward Throttle (965-967) - ch1Min
5. Offset Value
int offset = 15; // Offset value for STOP function, get value from Serial Monitor
Offset value is the value to set the motor stop. Due to the sensitivity and inconsistent value of the joystick, we need to set some offset to calibrate the value. This value might be lower or might be higher depending on your RC controller.
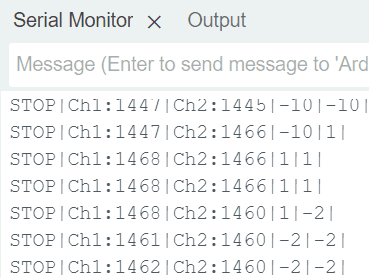
For example, the “zero” value right now is 1447-1468 (from 1 to -10) for channel 1
6. Library Use
MakerSumo.begin();
Put a “MakerSumo.begin()” to include the library for Maker Mini Sumo controller.
Serial.begin(9600);
“Serial.begin(9600)” to display the serial monitor the value that we need for calibration
7. Input Pin
pinMode(chA, INPUT);
pinMode(chB, INPUT);
Set chA and chB as an input
8. PulseIn Function
ch1 = pulseIn (chA,HIGH); //Read and store channel 1
ch2 = pulseIn (chB,HIGH); //Read and store channel 2
pulseIn function is used to read and store the value for channel 1 and channel 2
9. Serial Reading
Serial.print ("Ch1:"); //Display text string on Serial Monitor to distinguish variables
Serial.print (ch1); //Print in the value of channel 1
Serial.print ("|");
Serial.print ("Ch2:");
Serial.print (ch2);
Serial.print ("|");
All the value will be displayed on Serial Monitor
10. Speed Mapping
//LEFT & RIGHT
int SpeedCh1 = map(ch1,ch1Min,ch1Max,-255,255);
Serial.println (SpeedCh1);
Serial.print ("|");
//FORWARD & BACKWARD
int SpeedCh2 = map(ch2,ch2Min,ch2Max,-255,255);
Serial.println (SpeedCh2);
Serial.print ("|");
This syntax is use to map the value of ch1 and ch2 with pwm value (from -255 to 255)
11. Forward Function
if (SpeedCh2 > offset && SpeedCh2 <= 255)
{
Serial.print("FORWARD");
Serial.print ("|");
MakerSumo.setMotorSpeed(MOTOR_L, SpeedCh2); // Left motor forward
MakerSumo.setMotorSpeed(MOTOR_R, SpeedCh2); // Right motor forward
}
12. Backward Function
else if (SpeedCh2 < -offset && SpeedCh2 >= -255)
{
Serial.print("BACKWARD");
Serial.print ("|");
MakerSumo.setMotorSpeed(MOTOR_L, SpeedCh2); // Left motor backward
MakerSumo.setMotorSpeed(MOTOR_R, SpeedCh2); // Right motor backward
}
13. Right Function
else if (SpeedCh1 > offset && SpeedCh1 <= 255)
{
Serial.print("Turn RIGHT");
Serial.print ("|");
MakerSumo.setMotorSpeed(MOTOR_L, SpeedCh1); // Left motor forward
MakerSumo.setMotorSpeed(MOTOR_R, -SpeedCh1); // Right motor backward
}
14. Left Function
else if (SpeedCh1 < -offset && SpeedCh1 >= -255)
{
Serial.print("Turn LEFT");
Serial.print ("|");
MakerSumo.setMotorSpeed(MOTOR_L, SpeedCh1); // Left motor backward
MakerSumo.setMotorSpeed(MOTOR_R, -SpeedCh1); // Right motor forward
}
15. Stop Function
else if (SpeedCh1 <= offset && SpeedCh1 >= -offset)
{
Serial.print("STOP");
Serial.print ("|");
MakerSumo.setMotorSpeed(MOTOR_L, 0); // Left motor stop
MakerSumo.setMotorSpeed(MOTOR_R, 0); // Right motor stop
}
Hardware Components

FlySky 3 Channels RC Radio Transmitter and Rece...
S$67.86 S$67.86
x 1 unit(s)
 Backorder Only
FlySky 6 Channels RC Radio Transmitter with FS-...
S$103.57 S$103.57
x 1 unit(s)

Maker Mini Sumo Controller: Simplifying Sumo Ro...
S$38.93 S$38.93
x 1 unit(s)
Related Posts

Let’s Upgrade your Mini Sumo to 1kg Sumo Robot
This tutorial is specially designed for robotics enthusiasts that are excited about 1kg Sumo Robot. Let’s start on this journey!..
Build 1KG RC Sumo Robot using MDDRC10
This is a RC Sumo Robot based on MDDRC10 Motor Driver. The sizes are 15cm(L) x 15cm(W) with below 1kg (weight). The spec is for 1kg Sumo Robot Competition..