 International
 Singapore
 Malaysia
 Thailand
 Vietnam
Your shopping cart is empty!
 How to use RS485 sensor with IRIV PiControl through Modbus RTU Protocol")
(Temperature and Humidity) How to use RS485 sensor with IRIV PiControl through Modbus RTU Protocol
Note: This tutorial is not meant for beginners. This tutorial is for industries that want to use IRIV PiControl with RS485 sensors, alongside any other industrial-grade equipment. This tutorial also assumes that you are already familiar with Raspberry Pi OS, Raspberry Pi Compute Module 4 (CM4), how to flash Raspberry Pi OS into CM4, understand and are able to do SSH remote access. You should also understand and be able to do proper electrical wiring.
Note: CAUTION! Some of the components you might use may involve AC Power. This is very dangerous if not handled correctly. Please make sure you are able to understand the schematic diagram and able to do the electrical wiring properly.
Note: IRIV PiControl comes with Raspberry Pi OS flashed into the eMMC of the CM4. So you don't need to do any OS flashing unless it is necessary.
RS485 Protocol is one of the well-known Serial Communication methods which is widely used in industries. It is because of the ease of use which only requires 2 2-pin connection, and flexibility which multiple RS485 components can be daisy-chained together on the pin. In this tutorial, we will use the Industrial Grade RS485 Temperature & Humidity Sensor which is available in our store. You can get the sensor here. This sensor is capable of measuring the temperature and humidity of the surroundings with reliable accuracy.
The components that will be used in this tutorial are:
For the first-time setup, you may need a Monitor, Keyboard, and Mouse. You need to configure the WiFi network for the IRIV PiControl to connect. Boot your IRIV PiControl. On the desktop, click on the network icon on the top right corner of the screen, choose your WiFi, enter the password of your WiFi, and connect.

When you successfully connect to the WiFi, the IP Address of the IRIV PiControl will appear on the OLED screen on the side of the IRIV PiControl.
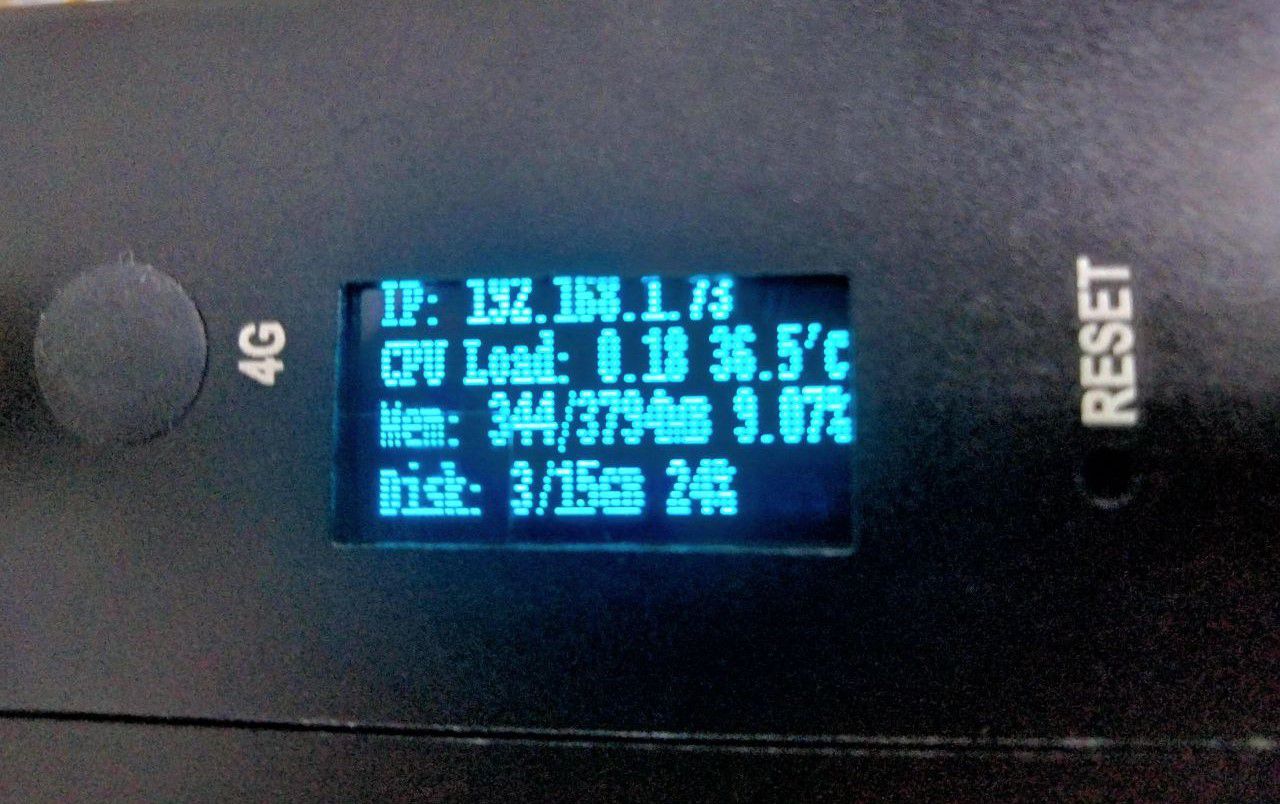
Now you can remove the Monitor, Keyboard, and Mouse from the IRIV PiControl. It will automatically connect to the same WiFi network every time it is available. You can also view the IP Address on the OLED screen instead of needing to use a Monitor to look up the IP Address if it's ever changed.
You can proceed to access your IRIV PiControl remotely through SSH. Now with everything ready, we can proceed with the tutorials.
1. Install 'pymodbus' library.
pip3 install -U pymodbus
2. Next, let's connect the sensor to the IRIV PiControl. First, we need to set the Unit ID / Device Address for the sensor. This ID will be used in our code later to get the readings. To do this, we need to open the sensor to gain access to a DIP switch on the PCB itself. Gently twist to open both ends of the sensor. Please twist one end at a time.
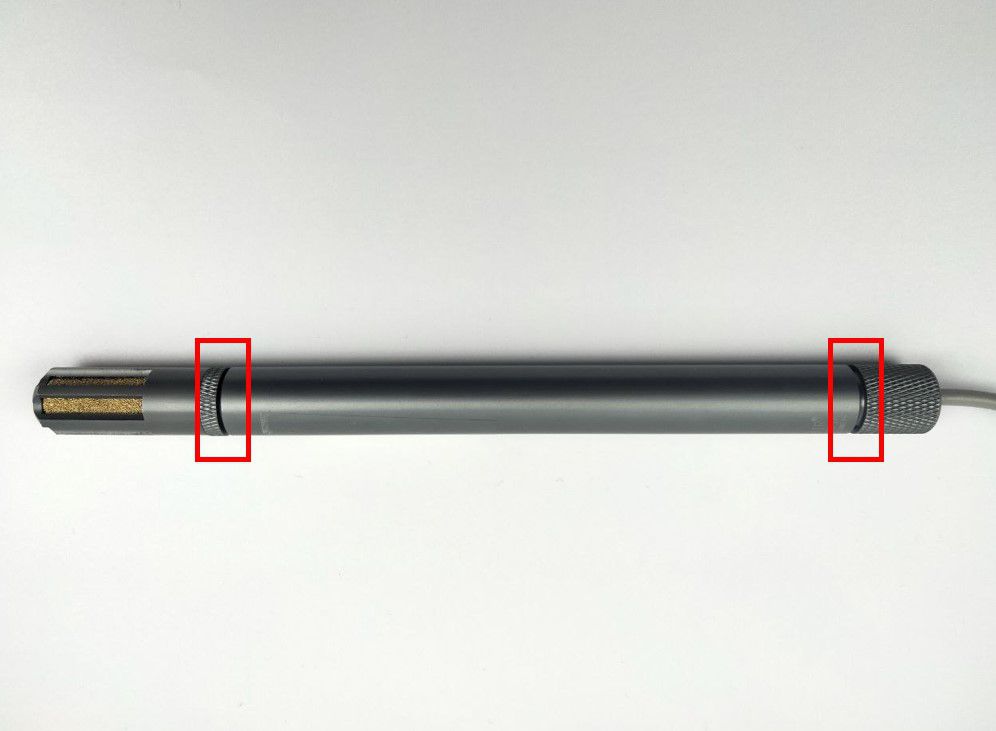
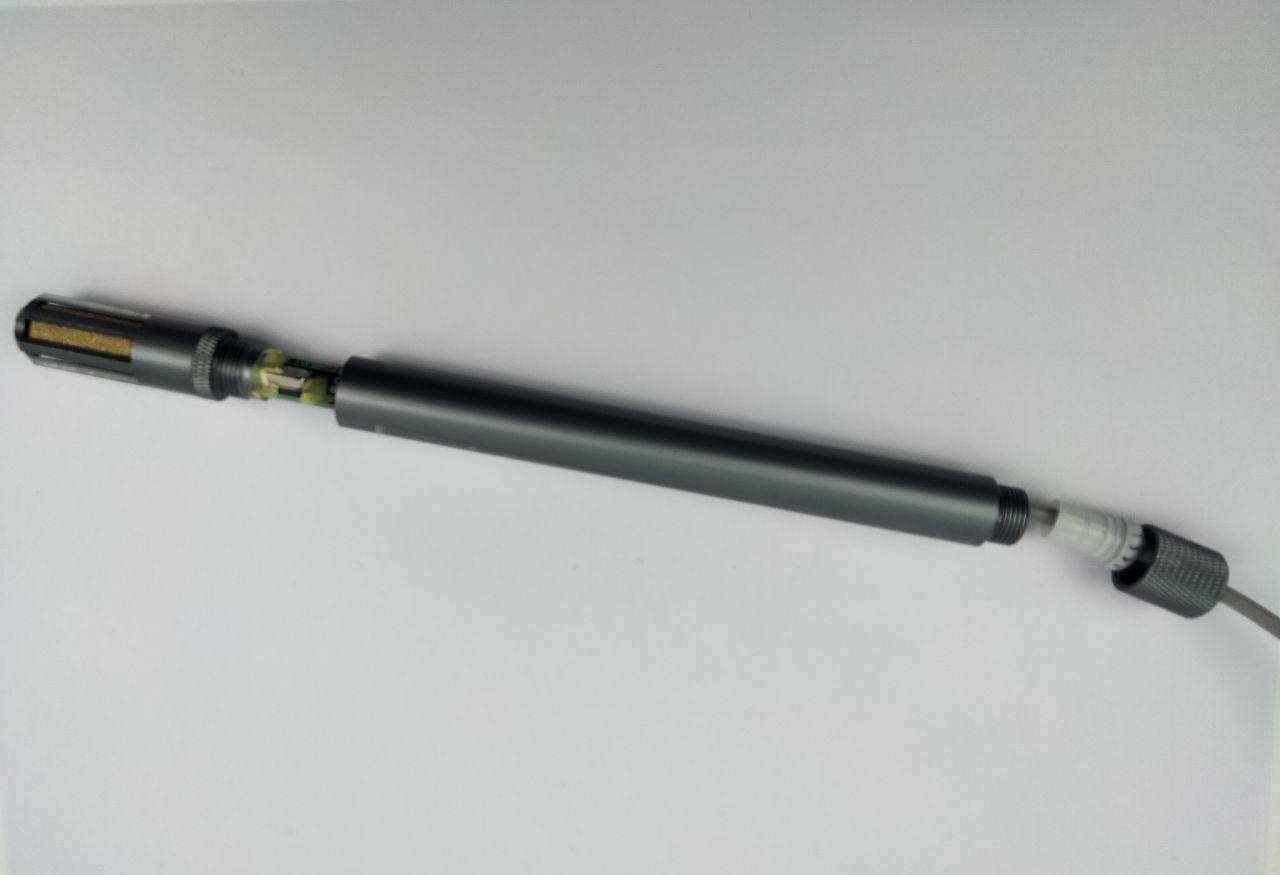
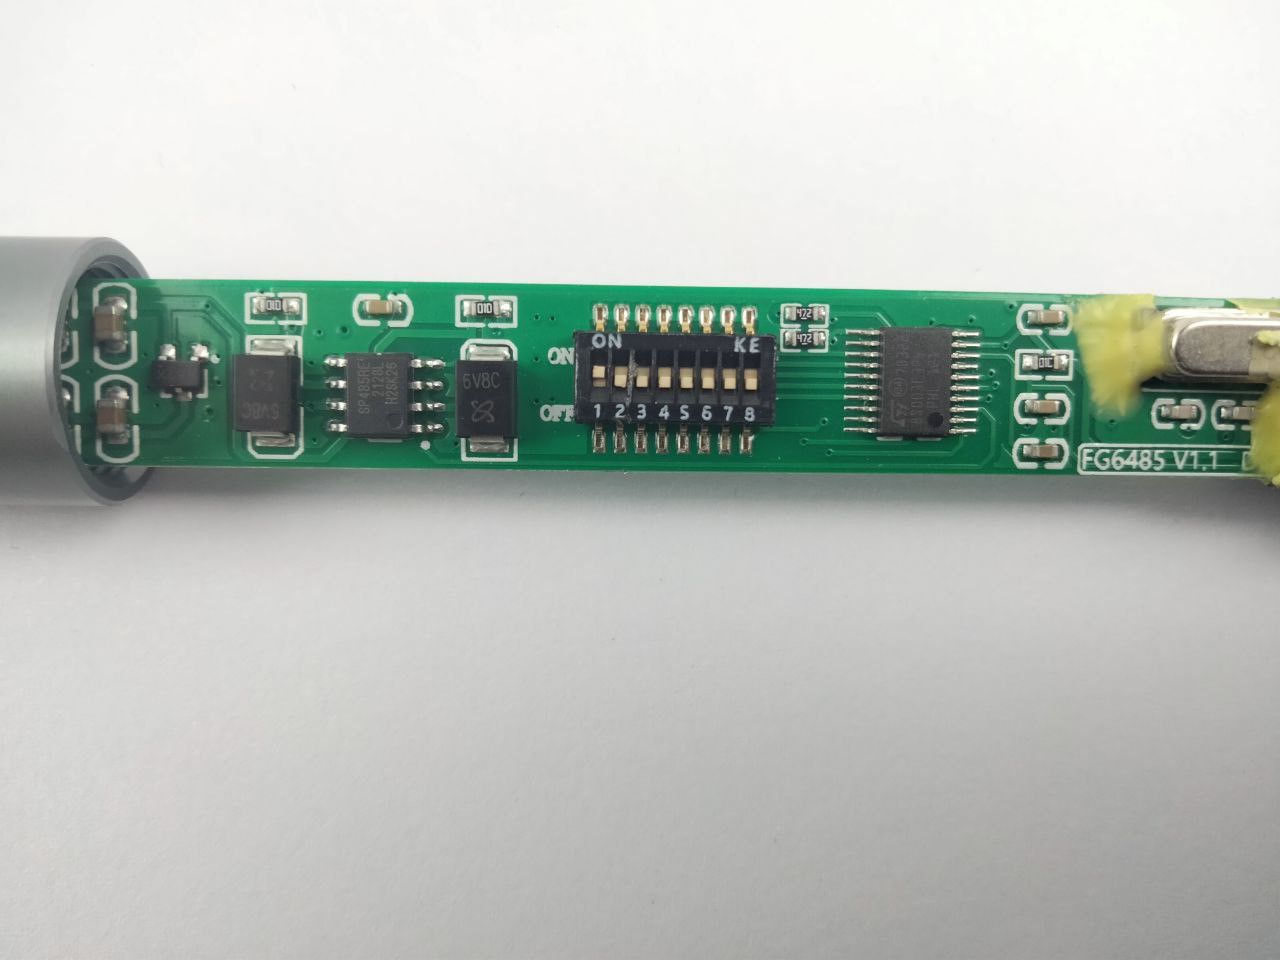
Next, pull out the PCB from the metal shell carefully. You should be able to see a DIP switch on the PCB. This DIP switch will determine the Unit ID of the sensor. To learn more about how to set the Unit ID, please refer to the sensors datasheet here. For this tutorial, we are going to set the Unit ID to 1. Configure the DIP switch as shown in the image below to set the Unit ID to 1.
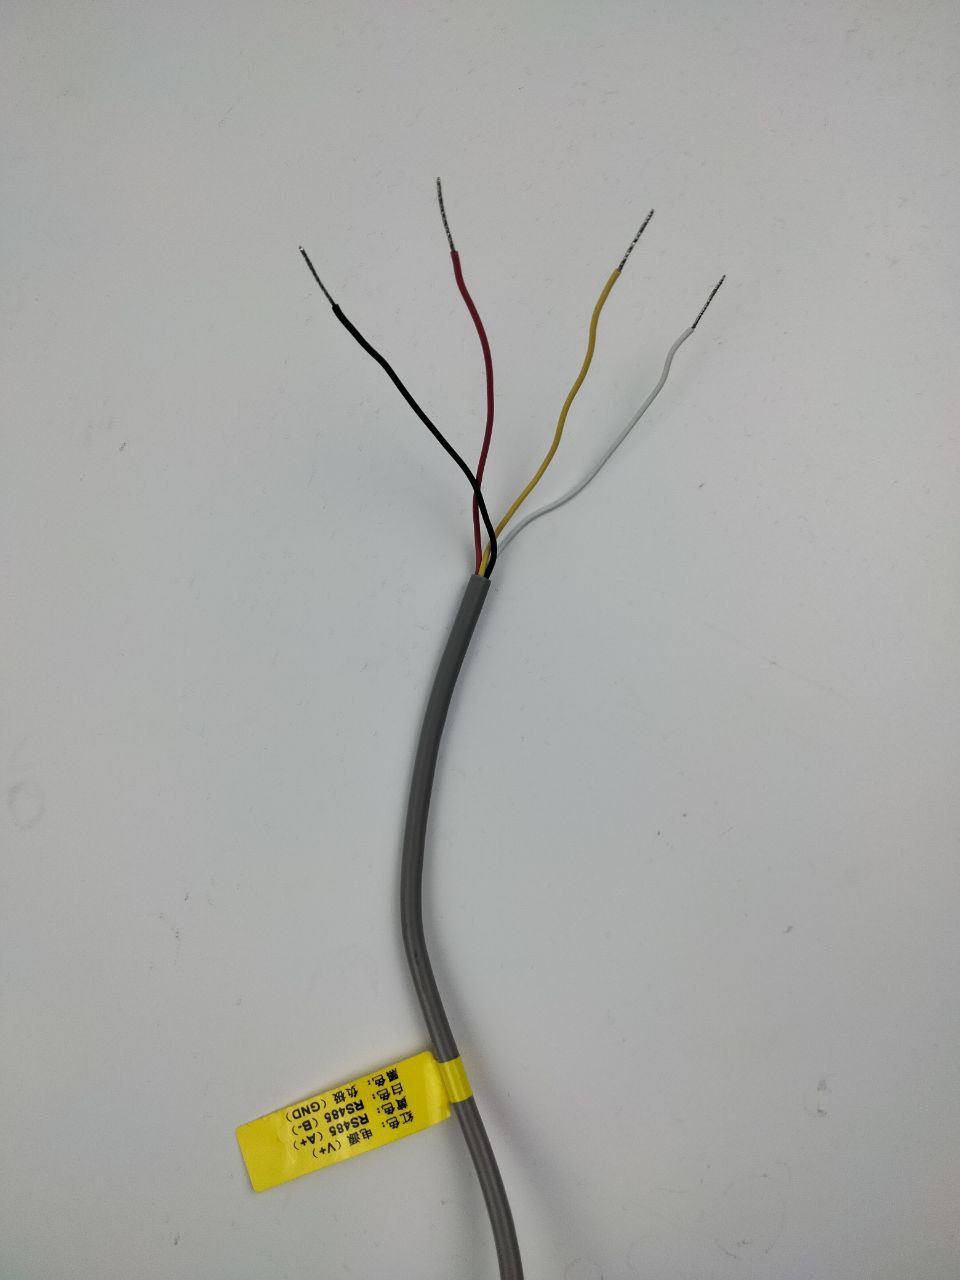
Now, assemble the sensor back properly. And we are ready to connect the wires to IRIV PiControl. The sensors come with 4 color-coded wires:
- Yellow: RS485 A
- White: RS485 B
- Red: VCC
- Black: GND
On the IRIV PiControl, you need to focus on these ports:
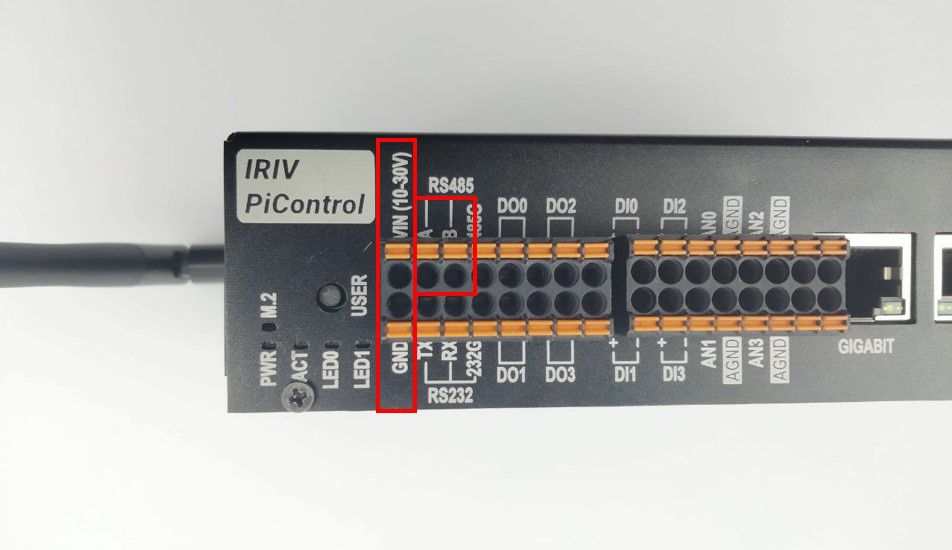
The connections are as below:
| Sensor | IRIV PiControl |
| RS485 A | RS485 A |
| RS485 B | RS485 B |
| VCC | VIN |
| GND | GND |
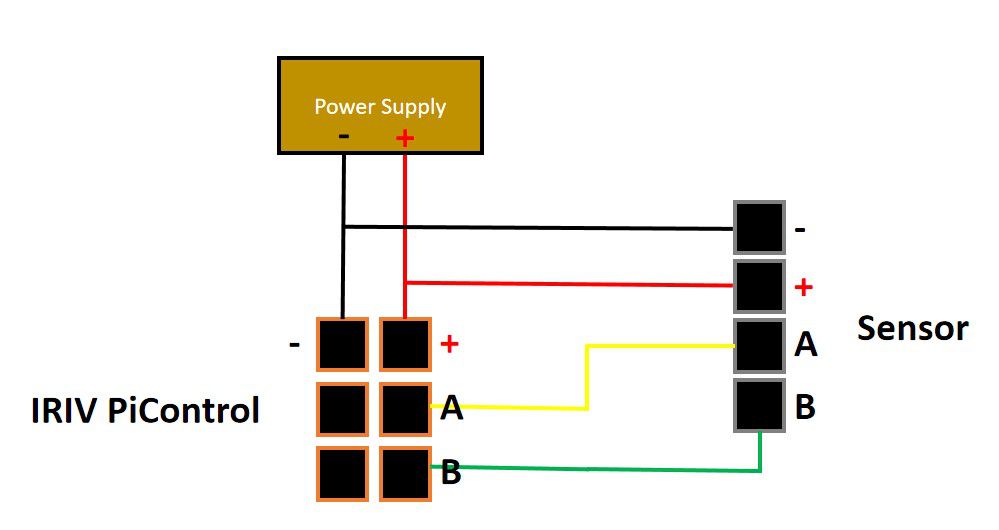
One of the main features of the IRIV PiControl is its isolated power connection system. This means all components will have their own power supply separately from the IRIV PiControl's power supply. This means that you will need an external power supply for your sensor. To learn more about the component connection with IRIV PiControl, please refer to its datasheet here. Simply connect the power supply to the VIN and GND of the IRIV PiControl. Sounds complicated right? Don't worry, your overall connection between the sensor, IRIV PiControl, and power supply should look like the diagram below:
Double-check your connection. If everything is good, we can proceed to program our sensor.
3. Power up your IRIV PiControl and access it using ssh. Open any text editor of your choice, and write this Python code. And then save it. Let's give it a name, sensor.py.
from pymodbus.client import ModbusSerialClient
from pymodbus.payload import BinaryPayloadDecoder
from pymodbus.constants import Endian
import time

client = ModbusSerialClient(port="/dev/ttyACM0",
                          method="rtu",
                          baudrate=9600,
                          stopbits=1,
                          bytesize=8,
                          parity='N',
                          timeout=1)

connection = client.connect()
if connection:
    print("Connected.")

while True:
    #client.read_holding_registers(Register Address, Register to Read, Unit ID)
    #Register Address 0 @ 0x000, Read Humidity
    resp = client.read_holding_registers(0x000,1,1)
    registers = resp.registers[0:1]
    Decoder = BinaryPayloadDecoder.fromRegisters(registers, Endian.BIG, wordorder=Endian.LITTLE)
    encoding = '16bit_int'
    result = getattr(Decoder,f"decode_{encoding}")()
    result = result / 10

    #Register Address 1 @ 0x001, Read Temperature
    resp2 = client.read_holding_registers(0x001,1,1)
    registers2 = resp2.registers[0:1]
    Decoder2 = BinaryPayloadDecoder.fromRegisters(registers2, Endian.BIG, wordorder=Endian.LITTLE)
    encoding = '16bit_int'
    result2 = getattr(Decoder2,f"decode_{encoding}")()
    result2 = result2 / 10

    # print(result)
    # print(result2)
    print(str(result) + '\t' + str(result2))

    time.sleep(1)

#Closes the underlying socket connection
client.close()
Most RS485 sensors read data from registers. Some sensors have more than two readings. You can refer to their respective manual or datasheets to learn more about their register address. Now, let's run the Python code.
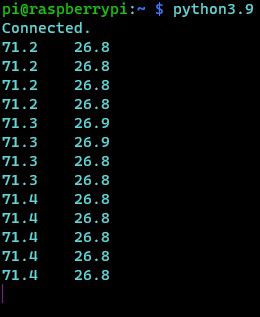
python3.9 sensor.py
You should be able to see the readings on the terminal. The humidity is on the left, and the temperature is on the right.
Now you are done! You can use this Python code and manipulate the variable with other wonderful stuff, for example, monitoring systems or even data logging!
Check out the image below, we already tried using IRIV PiControl with a full 'industrial-like' setup with a DIN rail attachment!

This is just one example of the application of IRIV PiControl. You can use it in many industrial environments and compatible with most industrial components.
Hardware Components

Industrial Grade RS485 Temperature & Humidi...
S$63.93 S$63.93
x 1 unit(s)

IRIV PiControl - IR4.0 CM4 Industrial Controller
S$420.00++ S$420.00
x 1 unit(s)