 International
 Singapore
 Malaysia
 Thailand
 Vietnam
Your shopping cart is empty!

How to Hide Z-Seam
- Abdulrahman Alhamed
- 08 Jul 2023
- Tutorial
- Beginner
- 3264
In 3D printing, precision and flawless finishes are highly sought after. However, a persistent challenge that often mars the final result is the presence of a visible seam known as the Z seam. This unsightly line is formed when the printer transitions between layers, leaving a noticeable mark on the surface of the printed object. Fortunately, there are effective techniques and settings that can be employed to conceal and minimize the visibility of the Z seam. In this article, we will explore the causes of this issue and provide valuable insights on how to successfully hide the Z seam, ensuring impeccable 3D prints every time.
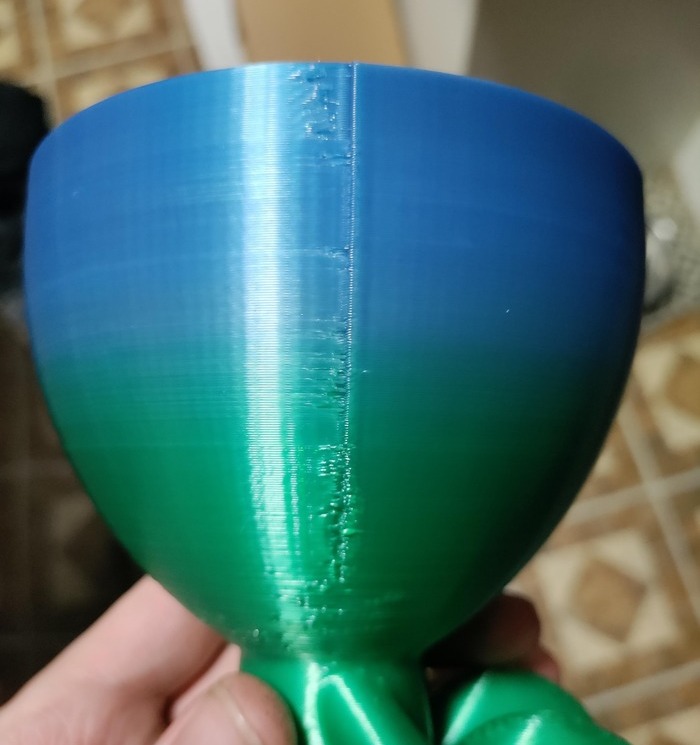
What is a Z-Seam in 3D Printing?
Source: Reddit
In 3D printing, a seam refers to the point where the printer's extruder nozzle begins a new layer during the printing process. As the printer moves horizontally along the X and Y axes, it deposits the molten filament to build each layer of the object. However, when transitioning from one layer to another, a slight interruption in extrusion and movement occurs, resulting in a visible line or mark on the printed object's surface. This line, known as the seam, can be more pronounced depending on various factors such as the printer's hardware, the material being used, and the print settings.
The appearance of the seam can vary depending on the type of 3D printer and the chosen printing technique. For example, in fused deposition modeling (FDM) printers, the seam is commonly referred to as the Z seam since it occurs along the Z-axis during layer changes. In other printing methods like stereolithography (SLA) or digital light processing (DLP), the seam may be less noticeable or absent altogether due to the continuous nature of the printing process.
Understanding the nature of the seam is crucial for achieving high-quality 3D prints. While it is challenging to completely eliminate the seam, there are techniques and adjustments that can be employed to minimize its visibility and create more aesthetically pleasing objects.
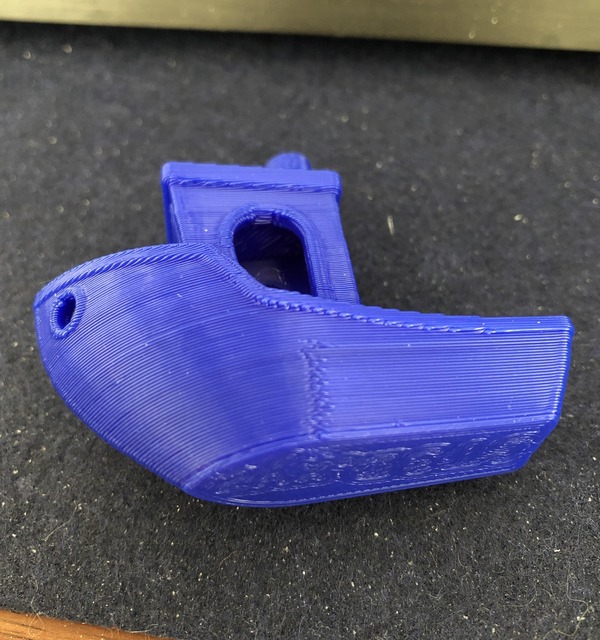
Causes of Z-Seam
Source: Reddit
Understanding the causes of the Z seam is crucial in devising strategies to minimize its appearance. The seam typically arises from the point where the printer's extruder nozzle starts a new layer. This transition results in a slight variation in the extrusion and movement, leading to a visible line on the print's surface. Several factors contribute to the prominence of the Z seam, including the printer's hardware, the material being used, and the slicer settings. By comprehending these factors, we can take proactive steps to mitigate the visibility of the seam and achieve smoother, more professional-looking prints.
How to prevent it?
When using the popular Cura slicer software, there are several settings you can adjust to prevent the Z seam:
Adjusting the flow rate: The flow rate, also known as the extrusion multiplier, determines the rate at which filament is extruded. Fine-tuning this value, usually expressed as a percentage, is best done after calibrating your extruder. By adjusting the flow rate, you can achieve more precise extrusion, reducing the visibility of the Z seam.
Nozzle temperature: The nozzle temperature, or hot end temperature, plays a critical role in the extrusion process. A higher temperature causes the filament to melt and flow more quickly. However, excessive heat can lead to over-extrusion, making the Z seam more noticeable. Finding the optimal nozzle temperature for your specific filament can help minimize the seam's visibility.
Print speed: The print speed setting controls the speed at which the nozzle moves during printing. Lowering the print speed allows more time for the filament to extrude, reducing the pressure build-up in the hot end. This can result in smoother transitions between layers and less pronounced Z seams. Experimenting with different print speeds can help you find the balance between print quality and printing time.
By adjusting these Cura slicer settings, you can fine-tune the extrusion process, minimize over-extrusion, and ultimately, enhance the concealment of the Z seam. Remember to make gradual changes and perform test prints to evaluate the impact of each adjustment.
Conclusion
While completely eliminating the Z seam in 3D printing may be challenging, implementing preventive measures, optimizing slicer settings, and utilizing post-processing techniques can significantly reduce its visibility. By adjusting print speed and temperature, and employing methods like sanding or filling, you can achieve smoother layer transitions and minimize the visual impact of the seam. Through continuous experimentation and attention to detail, you can elevate the quality of your prints and achieve impressive results that showcase the true potential of 3D printing technology.