 International
 Singapore
 Malaysia
 Thailand
 Vietnam
Your shopping cart is empty!

Create Customized 3D Printed Text Using Tinkercad: A Step-by-Step Guide
- Abdulrahman Alhamed
- 30 Mar 2023
- Tutorial
- Beginner
- 1391
3D printing technology has opened up a whole new world of creative possibilities, and one of the most exciting applications is the ability to create custom text in three dimensions. With the help of Tinkercad, a user-friendly 3D design software, making 3D print text has never been easier. Whether you want to make a sign for your business, a personalized gift for a loved one, or just explore your own creativity, the possibilities are endless.
The great thing about 3D printing text is that you can customize it to fit any style or design. You can choose from a wide range of fonts, colors, and sizes to make something truly unique. Plus, because 3D printing is a highly accurate and precise technology, you can be confident that your finished product will look exactly the way you want it to.
In this step-by-step guide, we'll walk you through the process of making a 3D print text using Tinkercad. You don't need any previous experience with 3D design software or 3D printing to follow along. By the end of this guide, you'll have a complete understanding of how to create and 3D print your own customized text designs.
Step 1: Create a Project & Get Familiar
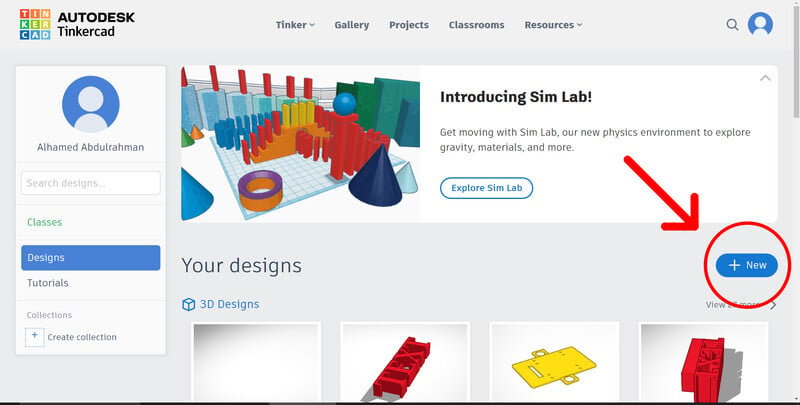
- Go to the Tinkercad website: To get started with Tinkercad, you need to go to the Tinkercad website. You can do this by typing tinkercad.com into your web browser.
- Sign up for an account or log in to your current one: If you already have a Tinkercad account, you can log in to it using your email address and password. If you don't have an account yet, you can sign up for a free one by clicking the "Sign up" button and entering your email address and a password.
- Start a new project: Once you've logged in or signed up, you'll be taken to the "Your Designs" page. From there, click the big plus button under "3D Designs" to start a new project.
- Take the time to explore the Tinkercad interface and familiarize yourself with the available tools, as Tinkercad has a user-friendly interface that makes it easy to create and manipulate 3D designs.
Step 2: Creating a Base for the Text

Before creating the text, it's important to create a base for it to sit on. This will ensure that the text is stable and doesn't topple over during the printing process. To create a base in Tinkercad, follow these steps:
- Click on the "Shapes" button on the right-hand side of the screen and select the shape you want to use for the base (e.g. a cube or a cylinder).
- Drag the shape onto the workplane.
- Use the scale tool to adjust the size of the shape according to your text size and placement.
The base is now ready for the text to be added on top of it.
Step 3:Creating the Text
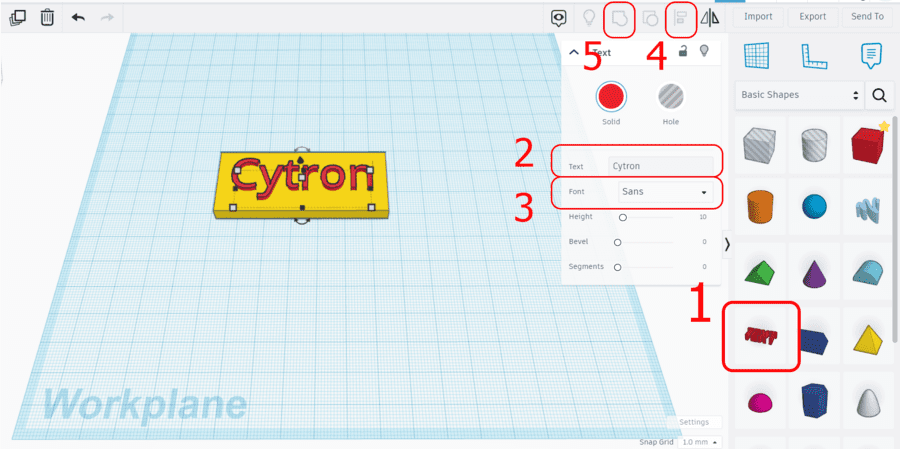
Now that you have created a base for the text to sit on, it's time to create the text itself. In Tinkercad, there are a few different ways you can create text, including using the text tool, importing a 2D image, or using a custom font. Here's how to create text using the text tool:
- Click on the "Text" button on the right-hand side of the screen.
- Type the text you want to create in the text box.
- Use the "Font" dropdown menu to select the font you want to use for the text.
- Use the "Alignment" and "Spacing" tools to adjust the text's position and spacing on the base.
- Once you're happy with the text's placement and appearance, group it with the base using the "Group" button.
Your 3D printable text is now complete and ready to be printed.
Step 4:Preparing for 3D Printing
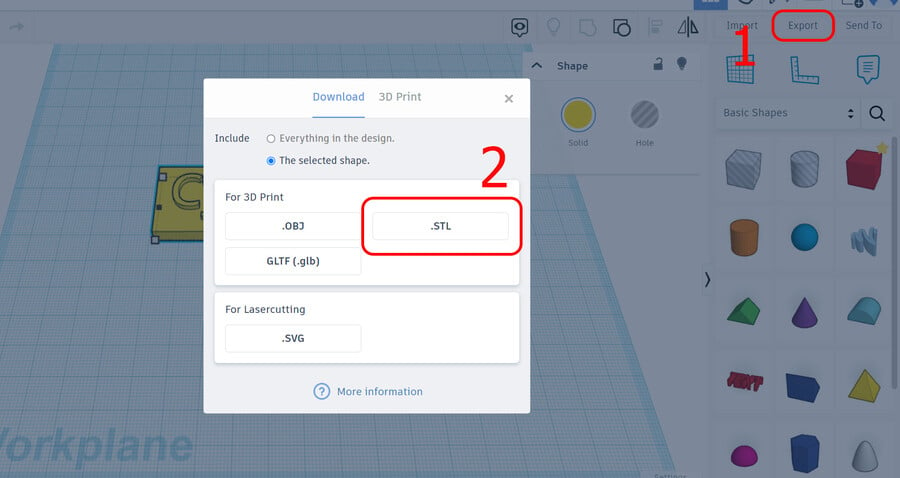
Before you can 3D print your text, you need to prepare the design file for printing. Here's how to do it in Tinkercad:
- Click on the "Export" button in the top right-hand corner of the screen.
- Select the file format you want to export the design as, such as STL or OBJ.
- Save the file to your computer.
- Open the file in your 3D printing slicer software.
- Slice the design into layers that can be printed.
- Set the printing parameters, such as layer height and infill percentage.
- Save the sliced file to an SD card or other storage medium.
Step 5:Printing the Text
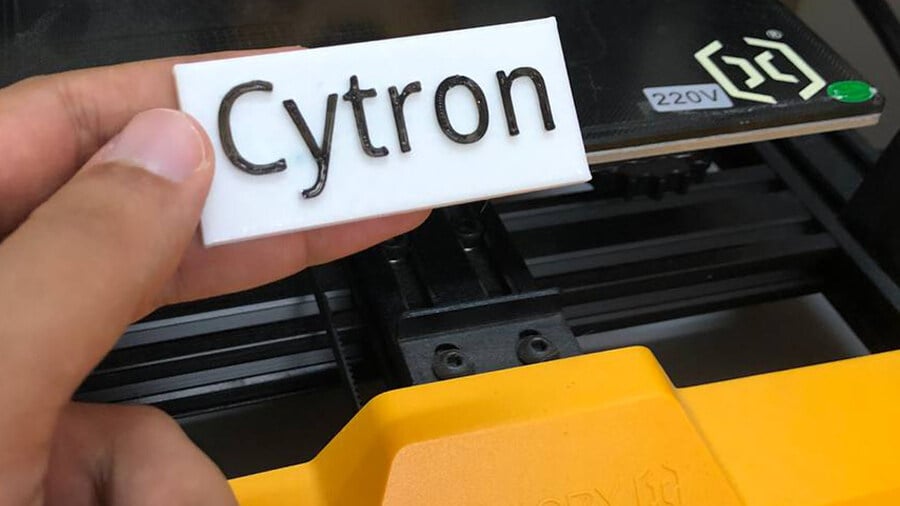
Now that you have prepared the design file, it's time to print your 3D text. Here are the steps to follow:
- Turn on your 3D printer and make sure it's connected to your SD card containing the sliced file.
- Start the printing process by selecting the sliced file on the printer's menu.
- Monitor the print to make sure it's proceeding as expected. If there are any issues, you may need to troubleshoot the printer or the design file.
- Once the print is complete, remove the text from the printer and remove any support structures if necessary.
- Clean the text with isopropyl alcohol or other cleaning solution if necessary.
- Enjoy your custom 3D printed text!
Extra Tip: Customizing the Design
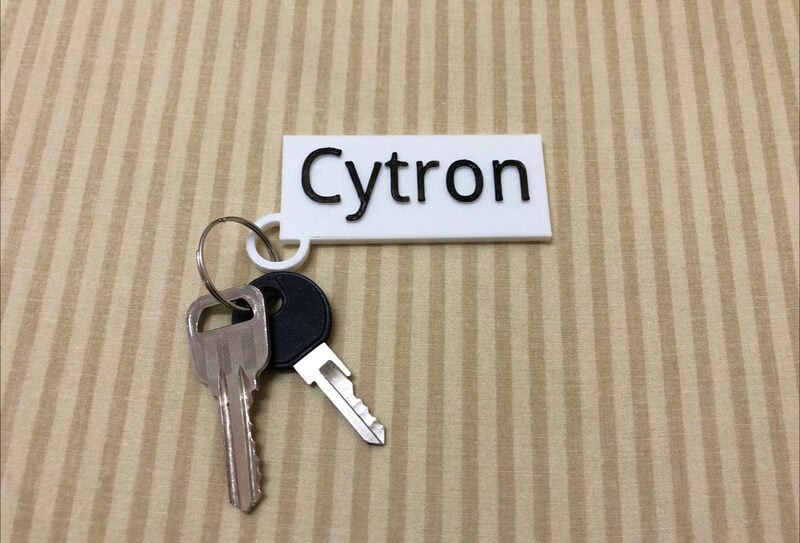
If you want to take your 3D printed text to the next level, you can modify the design to create custom keychains, pendants, or other personalized items. To do this, you can simply add a hole or loop to the design using Tinkercad's shape tools. This will allow you to easily attach a keychain ring or other hardware to the printed object.
Additionally, you can experiment with different font styles, sizes, and colors to create a unique look for your 3D printed text. This is a great way to add a personal touch to your projects and make them stand out. Remember to always test your design in Tinkercad's preview mode before sending it to the printer, to ensure that your modifications don't compromise the structural integrity of the object.
With these extra tips, you can take your 3D printing projects to new heights and explore the endless possibilities of this exciting technology.
Hardware Components
 -7%
-7%Creality Ender-3 V3 SE 3D Printer + 1KG PLA
S$356.07 S$382.86 S$356.07
x 1 unit(s)